Writing GNOME Apps with Swift

Swift is well-suited for creating user interfaces thanks to the clean syntax, static typing, and special features making code easier to write. Result builders, combined with Swift’s closure expression syntax, can significantly enhance code readability.
Adwaita for Swift leverages these Swift features to provide an intuitive interface for developing applications for the GNOME platform. GNOME is a popular, open source desktop environment for Linux, known for its emphasis on simplicity and accessibility. It offers an intuitive user interface, with a vast app ecosystem built using its modern Adwaita design language. Explore a collection of great apps under Apps for GNOME.
Let’s look at a code example of using Adwaita for Swift. The following code snippet defines a view, which represents a part of the user interface inside a window.
struct Counter: View {

    @State private var count = 0

    var view: Body {
        HStack {
            Button(icon: .default(icon: .goPrevious)) {
                count -= 1
            }
            Text("\(count)")
                .style("title-1")
                .frame(minWidth: 100)
            Button(icon: .default(icon: .goNext)) {
                count += 1
            }
        }
    }

}
A view can be nested within other views or added as the child of a window.
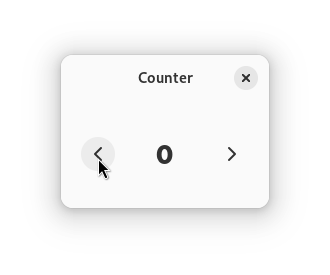
Its content can be modified from outside that view and is influenced by its position in the view hierarchy. This makes it easier to compose views to produce different results. The screenshot shows one simple possibility.
Motivation
The primary motivation for this package is to enable the use of Swift when writing GNOME apps, for all the reasons outlined above. But there are a few additional reasons:
Declarative
While there are already libadwaita and GTK bindings for numerous modern programming languages, including Rust, Python, and JavaScript, all official bindings follow an imperative coding style. This can be verbose and harder to follow than a declarative style as user interfaces are constructed using a series of commands. The following Python code serves as an illustration of this.
class Counter(Gtk.Box):

    def __init__(self):
        Gtk.Box.__init__(self, orientation=Gtk.Orientation.HORIZONTAL, spacing=6)
        self.count = 0

        button_prev = Gtk.Button.new_from_icon_name("go-previous", Gtk.IconSize.BUTTON)
        button_prev.connect("clicked", self.on_prev_clicked)
        self.pack_start(button_prev, True, True, 0)

        self.label = Gtk.Label(label=str(self.count))
        self.label.set_name("title-1")
        self.pack_start(self.label, True, True, 0)

        button_next = Gtk.Button.new_from_icon_name("go-next", Gtk.IconSize.BUTTON)
        button_next.connect("clicked", self.on_next_clicked)
        self.pack_start(button_next, True, True, 0)

    def on_prev_clicked(self, button):
        self.count -= 1
        self.label.set_text(str(self.count))

    def on_next_clicked(self, button):
        self.count += 1
        self.label.set_text(str(self.count))
This Python code uses the PyGObject library and produces the same user interface as the Swift code above.
Ease of Use
As you can see, Adwaita for Swift is built around data.
For example, changing the variable count when pressing one of the buttons in the sample app will automatically update the user interface.
Traditional bindings require you to call a function on the object holding a widget that should update its content once a value changes.
If you decide to store the value on the disk so that it persists between startups of the app, you would have to add a lot of complexity to your code using traditional bindings. Adwaita for Swift enables you to simply add a unique identifier to the variable that should be stored, and will take care of the rest.
@State("count") private var count = 0
There is also a simple and safe approach for localization with the Localized package.
Readability
The simplicity coming with the data-centric approach has a positive impact on readability.
Another point is the declarative definition of the user interface itself. You can focus on what the app should look like and how it should behave rather than how to achieve those results.
While there are other solutions available, such as defining the UI with XML and Blueprint, they require the user interface and actual code to be written in different files. Also, updating the user interface has to be done manually whenever data changes. This makes it more difficult to follow the logic as a reader.
As the user interface is written in Swift, you can use convenient Swift syntax directly in your user interface definition.
var view: Body {
    if count == 0 {
        Text("😍")
    } else {
        Text("\(count)")
    }
}
Cross-Platform App Development
Adwaita for Swift is useful in a number of ways:
- You can write apps that run on Linux, macOS and Windows with a single codebase.
- You can share backend Swift code between SwiftUI apps and GNOME apps.
- You can create entirely new GNOME apps using Swift, achieving great code readability and memory safety.
Publish Apps
In addition to traditional distribution packages, Adwaita for Swift works great with Flathub. Flathub is an app store powered by Flatpak which simplifies the installation and publishing of apps for desktop Linux.
There is the Freedesktop SDK Extension for Swift 5 which adds support for Swift, and a tool to convert Swift Package Manager dependencies into Flatpak sources.
Learn how to publish your apps in the Adwaita for Swift documentation.
Get Involved
Each contribution to this project is highly appreciated.
You can:
- Create an app! Use the template repository as a starting point and refer to the tutorial. Feel free to showcase your project in the discussions. Note that libadwaita works best on Linux. If you’re on a newer Mac and interested in Linux, check out Asahi Linux.
- Open issues if you find any problems or if you have an idea, or participate in the dicussions by asking questions, dicussing ideas, or informing others about your work.
- Write documentation to help others understand Adwaita for Swift.
- Simply star the repository to improve its discoverability.
- Take a look at the Memorize app. It is the first app on Flathub built using Adwaita for Swift.
Thanks for your participation ❤️