Getting Started
Installing Swift
To kickstart your journey, install Swift to begin using it on macOS, Linux, or Windows.
Tip: To test that you have Swift installed, run
swift --versionfrom your shell or terminal app.
Swift comes bundled with the Swift Package Manager (SwiftPM) that manages the distribution of Swift code. It allows easy importing of other Swift packages into your applications and libraries, making it a valuable tool for any Swift developer.
Swift is covered by the Apache License, Version 2.0.
Using Swift
-
✨ New to Swift?
Swift is a great first language if you are just starting your programming journey. For a brief tour of the language, check out this introductory chapter in The Swift Programming Language book.
Read A Swift Tour
Here are some examples of the many use cases of Swift, in case you want to jump in and start writing some code right away.
-
Command-line Tool
Learn how to create cross-platform command-line tools such as short-lived interactive programs, or long-lived daemons that run in the background.
Start tutorial -
Library
Learn how to create a cross-platform library for sharing reusable code, or modularize large code-base.
Start tutorial -
Web Service
Learn how to create a web service using a web framework.
Start tutorial
This guide requires macOS or Linux. -
iOS and macOS Application
Learn how to create an iOS or macOS application using SwiftUI.
Start tutorial
This guide requires macOS and Xcode.
Looking for a language reference? The Swift Programming Language (TSPL) book is available in multiple languages.
Go Further
Ready to dive deeper? Here are some hand-picked resources covering various Swift features.
-
Value and Reference Types
This article describes the differences in behavior between value types and reference types—a fundamental part of learning Swift and choosing between structures and classes.
Read article -

Generics
In Swift, generics are a fundamental way to write abstract code. This video walks through the basics of Swift Generics and introducing generics into your code.
Watch video -
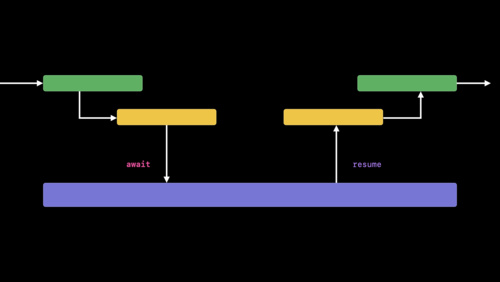
Concurrency
Swift has concurrency features built into the language making it easier to write concurrent code with the assistance of the compiler. This video introduces the async/await mechanism, a key part of Swift Concurrency.
Watch video -
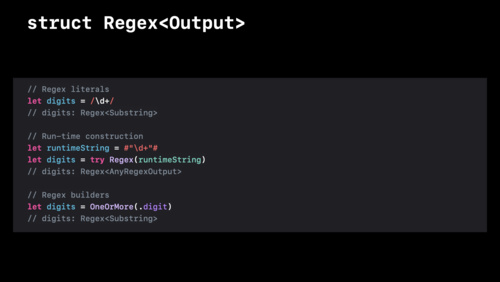
Regular Expressions
Swift provides first-class regular expression support, commonly known as regex, for effective string processing. This video gives an overview of the power and flexibility of Swift Regex.
Watch video -
Wrapping C/C++ Library in Swift
This article describes how to wrap a C or C++ library in Swift.
Read article
Looking for even more? In the documentation you can find resources, references, and guidelines related to the Swift project, including the API Design Guidelines.